SharePoint Permission Levels Explained: Access Control on Sites
1. SharePoint Access Control: A Breakdown of Permission Levels and Their Uses
Standard SharePoint Permission Levels
- Full Control
A user with full control permission will have full control over the site. They can do anything and everything within that site. This includes modifying the site, modifying site content, managing permissions, and deleting the site. They can also create pages, manage permissions, delete the site, and manage the Recycle Bin. - Design
A user who has design permission can view the site, customize the site, update the content, or approve the request.
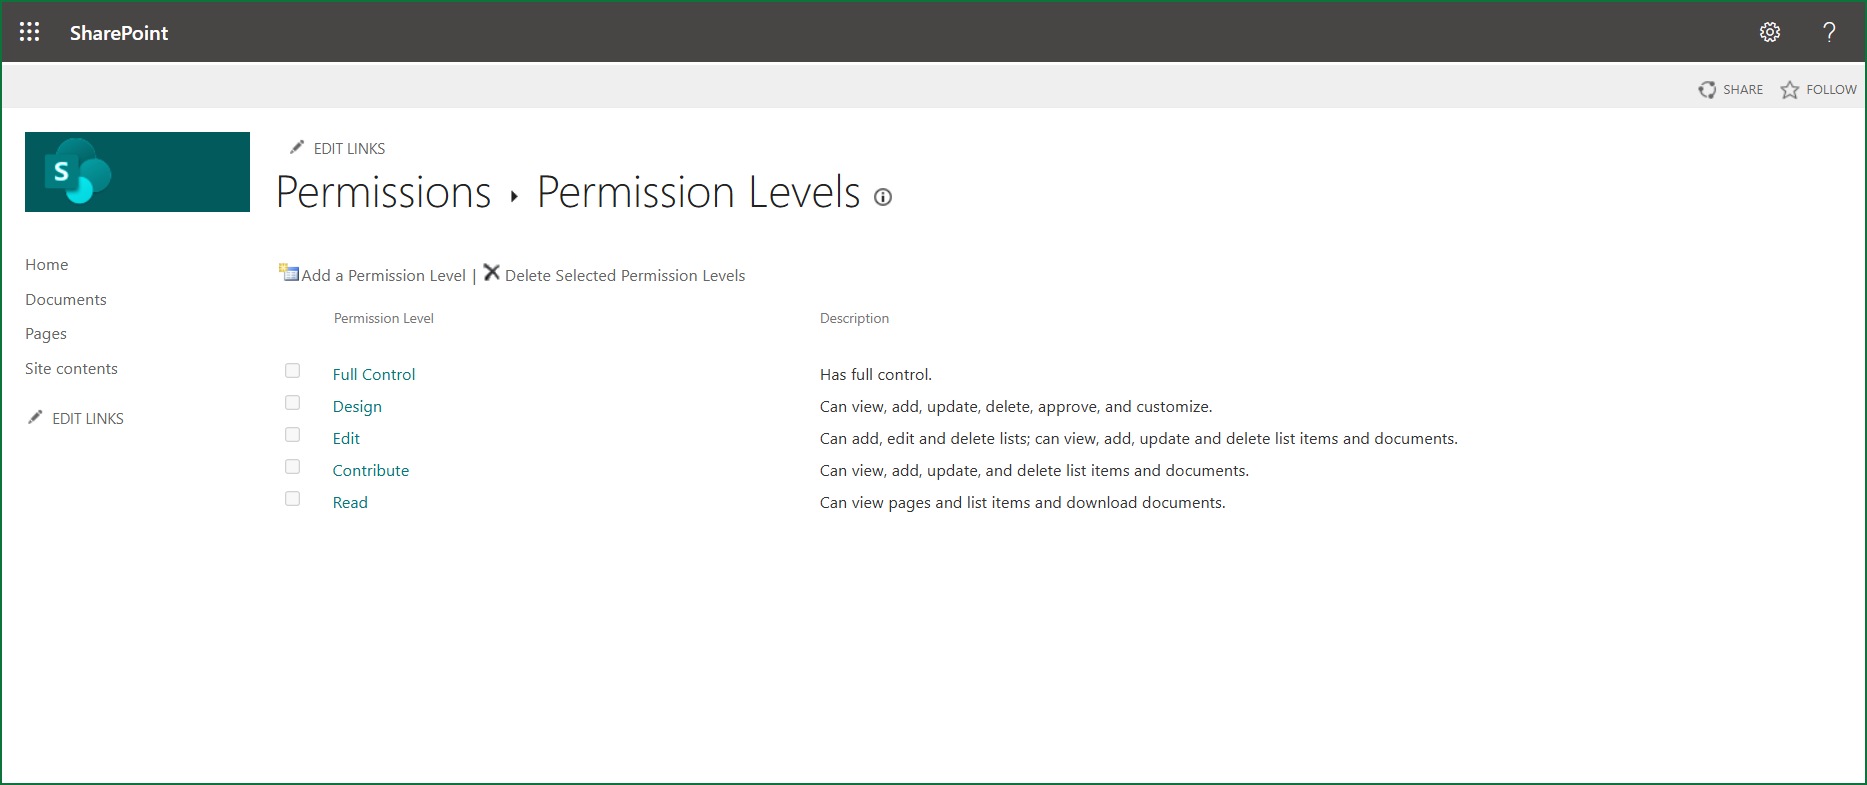
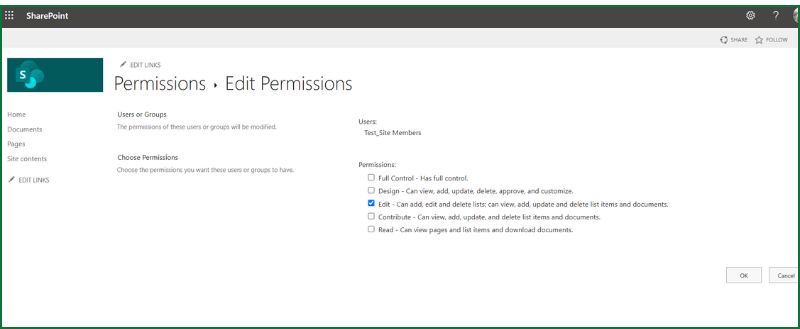
- Edit
A user who has edit permission can edit and delete the list or the list items, and they can delete the documents. If a user has the Edit permission level, most permissions are unchecked compared to Full Control, meaning they cannot perform certain activities like approving items, managing permissions, or creating subsites. - Contribute
A user who has contribute permission can view the site content, he can add or update the list items, delete items, and delete the documents. - Read
Users who have read permissions can view the site content, and they can download the documents, but they cannot make any changes within a particular site. The source also refers to this level of access as having “view only permission” or “read-only permission”.
2. Creating Custom Permission Levels in SharePoint
What Are Custom Permission Levels?
When Should You Create a Custom Permission Level?
Here are common scenarios where defaults fall short:
- Restricted Contributors: Users need to add/edit items but not delete them.
- Approvers Only: A group needs to approve content without editing it.
- View-Only with Restrictions: Users can view files but not download them
- Auditors: Access to view permissions/reports but no content editing.
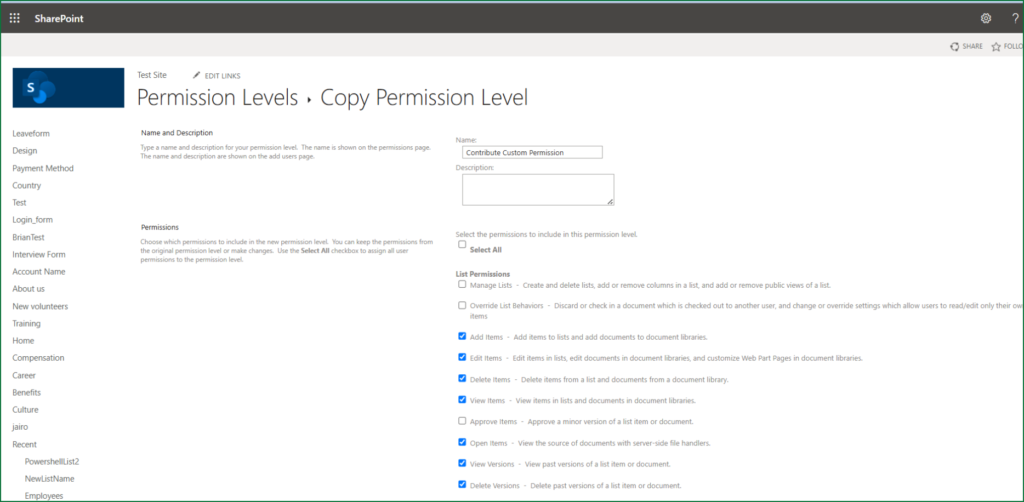
How to Create a Custom Permission Level in SharePoint
Step 1: Start with an Ideal Option
Always copy an existing permission level (e.g., “Contribute”) as a starting point. This saves time and avoids missing critical permissions.
Example:
Copy “Contribute” (which includes Add/Edit/Delete).
Remove “Delete Items” to create “Contribute – No Delete.”
Step 2: Create Your Custom Level
- Go to Site Settings > Site Permissions > Permission Levels > Advanced Permission Level.
- Click “Add a Permission Level” or “Copy Permission Level” (recommended).
- Name your level (e.g., “Approver Only”) and add a description.
- Check/Uncheck Permissions:
- Keep necessary permissions (e.g., “View Items”, “Approve Items”).
- Remove unwanted ones (e.g., “Edit Items”, “Delete Items”).
- Click Create.
Step 3: Assign the Custom Level
- Option 1: Assign directly to users/groups at the site level.
- Option 2: Apply to specific lists, libraries, or folders by breaking inheritance.
Example:
Assign “Contribute – No Delete” to a document library for interns.
Assign “Approver Only” to a workflow group for content reviews.
3. SharePoint Edit Permission Level: What It Really Means
What Does "Edit" Permission Level in SharePoint Really Mean?
When you’re managing a SharePoint site, giving users the right level of access is super important. One of the most commonly used levels is “Edit” — but many people don’t fully understand everything it allows.
Where You’ll Find Permission Levels
In SharePoint, go to:
Site Settings → Site Permissions → Permission Levels
You’ll see a list like:
- Full Control
- Design
- Edit
- Contribute
- Read
- (And even custom ones like “ReadOnlyPages”)
You can click on any of these to see what’s included.
What Does the “Edit” Permission Level Include?
What users with “Edit” can do:
- Add, update, and delete list items and documents
- Create and delete entire lists and libraries
- Add or remove columns in lists
- Change list settings and public views
- Upload or remove files from document libraries
- Customize Web Part pages inside libraries
- Bulk-edit list data (like Excel-style Quick Edit)
- Manage document versions (major versions only)
- Use drag-and-drop features in document libraries
Basically, users with “Edit” can change the structure of lists and libraries, not just the content inside them.
4. SharePoint Group Creation and Group-Level Permissions
How to Create SharePoint Groups and Assign Permissions
How to Create a SharePoint Group
Step 1: Navigate to Site Permissions
Go to your SharePoint site.
Click the gear icon in the top-right corner.
Select Site Permissions > Advanced Permissions Settings.
Step 2: Create a New Group
Click Create Group from the ribbon.
Fill in the details:
- Group Name
- Description
- Owner
Step 3: Configure Group Settings
Choose:
- Who can view membership
- Who can edit membership
Whether to allow join/leave requests
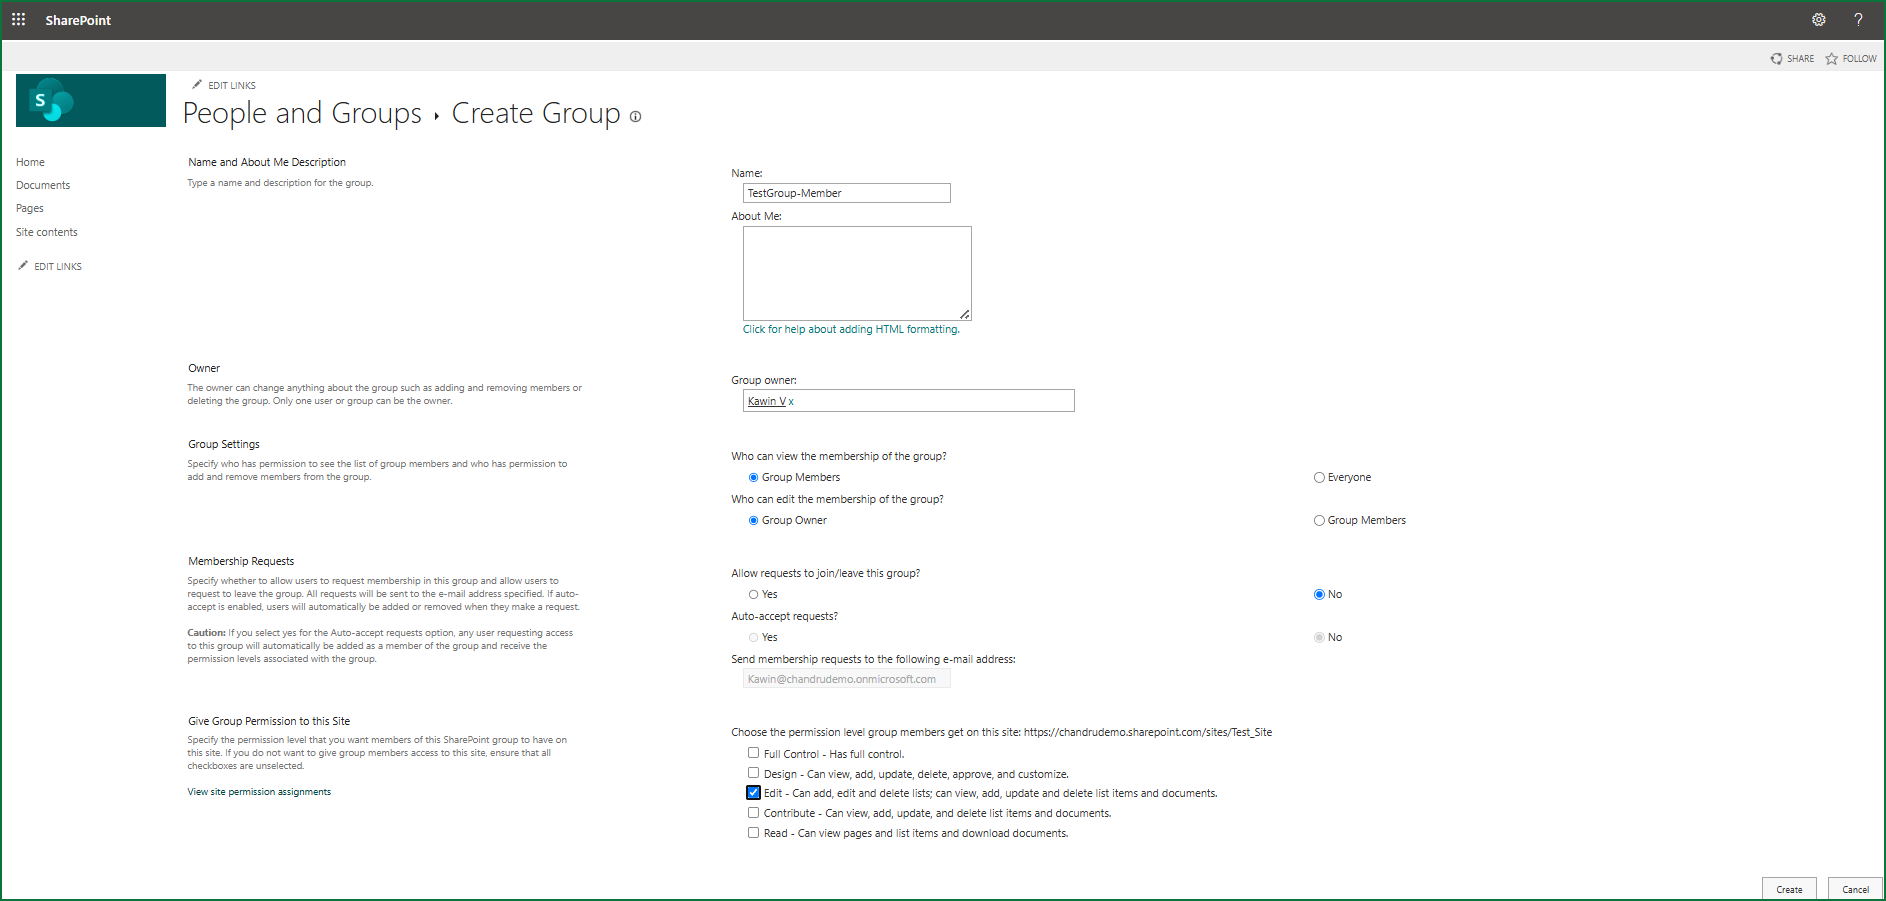
Step 4: Assign Permission Levels
- Select Read, Edit, Contribute, or Full Control.
You can also assign custom permission levels to groups.
Step 5: Save the Group
Click Create to finalize. The group now appears in the site’s permissions list.
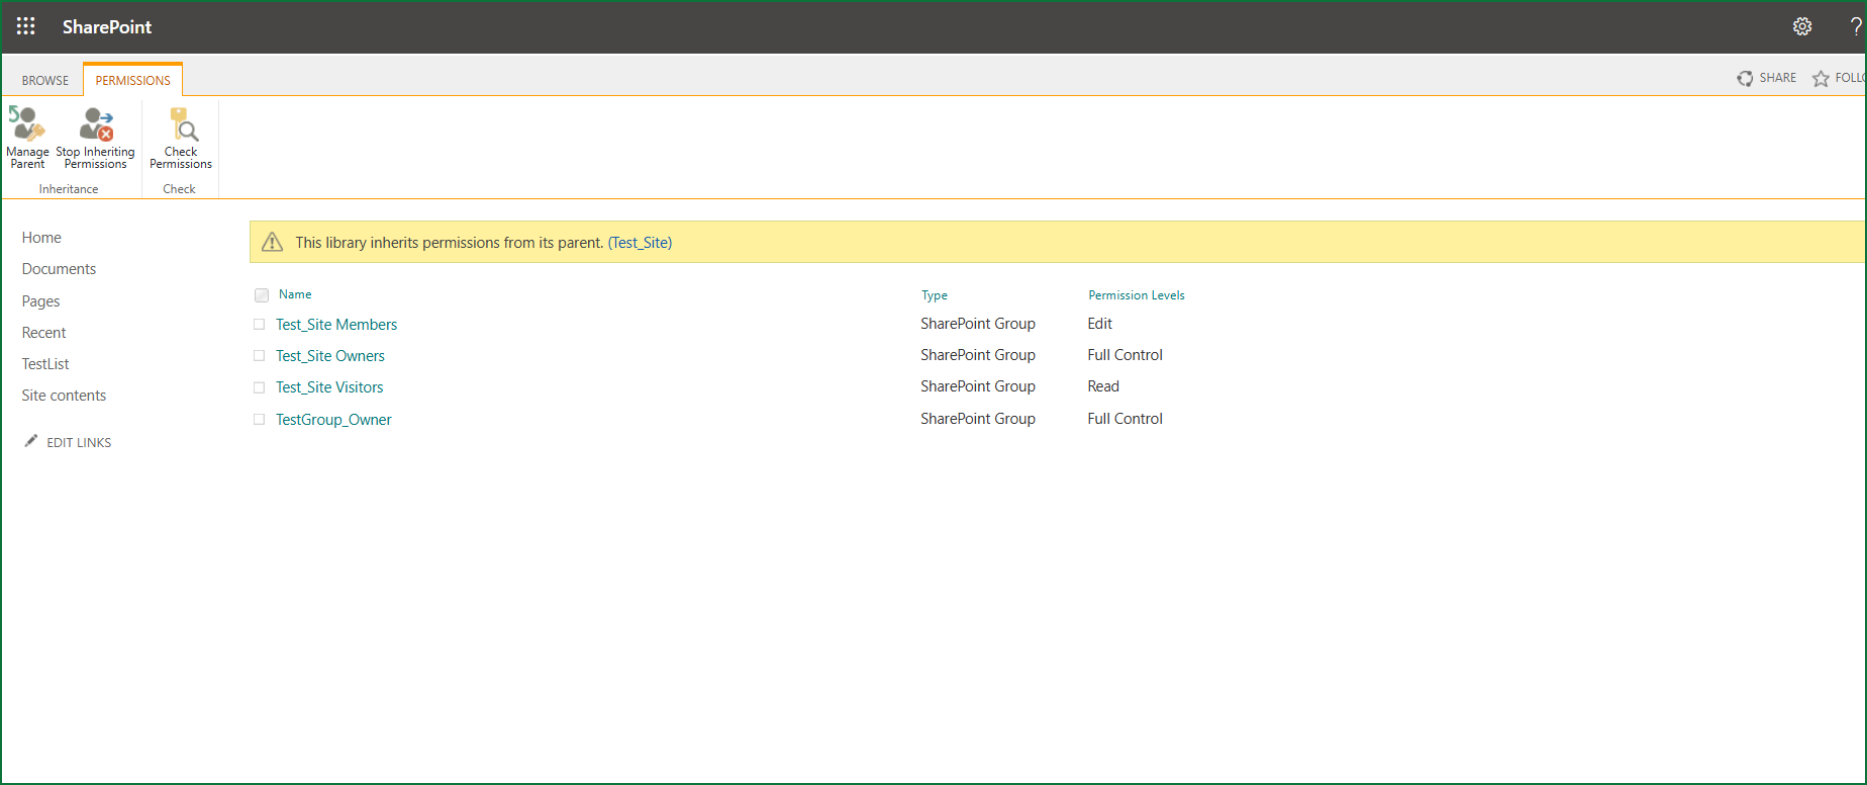
5 .Folder and Item-Level Permissions in SharePoint
Understanding Folder and Item-Level Permissions in SharePoint
Controlling access in SharePoint is key to securing your documents and list items. Whether it’s a document library or a SharePoint list, SharePoint lets you manage who can view or edit specific folders, files, or records using Manage Access.
Library – Folder and Record-Level Permissions
Folder-Level Permissions
- Right-click a folder → Manage Access → Stop Inheriting Permissions
- Add/remove users or groups with access
Record-Level (File) Permissions
List – Record-Level Permissions
- Click the 3 dots on a list item → Manage Access → Groups
Assign permissions per entry (e.g., for employee records or feedback forms)
How “Manage Access” Works
Three options:
- People: Add specific users
- Groups: Add SharePoint or Microsoft 365 groups
- Link Sharing:
- People in your org
- Specific people
- Anyone with the link (use carefully)
You can also control whether links allow viewing or editing.
Conclusion:
Mastering SharePoint permissions ensures secure and efficient collaboration. By using built-in and custom permission levels, assigning group-based access, and applying folder/item-level controls, you can precisely manage what users can do. This approach not only enhances data security but also boosts productivity across your organization.